Thursday, January 17, 2013

Retro Sketch for Stamp Club


Last night our stamp club met and created a Stamp-A-Stack. I used this week's Retro Sketch and created the 5 cards above. This sketch works very well for simple cards that can be produced quickly. I tried to create cards for various recipients including a masculine card. I love Stamp-A-Stacks since they are great to have on hand for personal use or to give as gifts.

I wanted to feature some really cool new stuff from the Sale-A-Bration brochure and the Spring Catalog, namely the Pretty Petites, Cioa! Baby stamps sets and corresponding punches. Sale-A-Bration begins next week, January 22nd.
Stamp - Pretty Petites
Paper - Sycamore Street DSP,  whisper white and pool party card stock
Ink - Tangerine Tango, Island Indigo
Accessories - Island Indigo Bakers Twine, Petite Curly Label Punch, 1" square punch, Square Lattice Embossing Folder


Stamp - Ciao! Baby
Paper - Polka Dot Parade DSP,  whisper white, basic black and not quite navy card stock
Ink - Old Olive
Accessories - Lucky Limeade Bakers Twine, Petite Curly Label Punch, 1" square punch, Argyle Embossing Folder

Stamp - Pretty Petites
Paper - Twitterpated DSP,  whisper white and pretty in pink card stock
Ink - Old Olive
Accessories - Pool Party Bakers Twine, Petite Curly Label Punch, 1" square punch, Elegant Bouquet Embossing Folder

Stamp - Ciao! Baby
Paper - Birds of a Feather DSP,  whisper white and crumb cake card stock
Ink - Marina Mist
Accessories -  Twine, Petite Curly Label Punch, 1" square punch, Stripes Embossing Fodler

Stamp - Pretty Petites
Paper - Floral District,  whisper white and daffodil delight card stock
Ink - Pumpkin Pie, Daffodil Delight, Melon Mambo
Accessories -  White Bakers Twine, Petite Curly Label Punch, 1" square punch, Perfect Polka Dots Embossing Folder

Tuesday, January 15, 2013

Retro Sketch for Dallas


Last month, Megan and Jake were able to attend a Dallas Cowboys football game with my husband and some business associates. They needed a thank you card for the firm that arranged the trip so I had an excuse to stamp. I used this week's Retro Sketch and incorporated the Dallas colors and the star. I just love the simplicity of this sketch and will be using it for some other projects this week.

Stamps - Made for You
Ink - Night of Navy
Paper - Whisper white, night of navy, silver, bashful blue card stock
Accessories - Stars die, Star brad, Stripe embossing folder

Monday, January 14, 2013

Large Drawstring Bag - Apron


OK I can put the sewing machine away again. I completed two projects today. The first is the larger drawstring bag I wanted to make for my larger knitting projects, namely a baby blanket I have started. I made up the pattern and lined it with the black and white fabric that is around the drawstring. Now to fill the bags with my projects and knit away.


This little apron is for my niece that I wanted to complete before the holidays, but I am very late checking this project off the list. I just fell in love with the cutie Paris fabric. The picture doesn't show very well that the Eiffel Towers are glittery. SUCH FUN! I hope she will like it along with all the baking equipment I am sending her way.

Well, perhaps I won't put the sewing machine away. I might have to keep it handy to sew on a few cards. You also never know when a Pinterest project will demand to be created:)

Sunday, January 13, 2013

One Thing Leads to Another - Drawstring Knitting Bag


Yes, one thing leads to another. As I was in the yarn shop the other day choosing yarn for a new project, I saw some really cute draw string bags to keep projects in. As I looked at the price tag, I gasped a little. Yes, they were cute, but I knew that I could probably make something just as useful for a fraction of the price. I mean C'mon, it's less than a yard of fabric. So off to Hobby Lobby I went for some fabric and pulled out the dusty sewing machine. A few hours later, I have my little bag.

 In my searchings on the web for a drawstring tutorial, I came across this cute pattern at Pink Penguin. Ayumi's bag was used as a lunch bag and included a waterproof liner - so clever! You can get the fabulous, easy to follow tutorial here. I liked that the bag had handles since I am always carrying a knitting bag to Megan's volleyball tournaments and practices. I think next I will be making my own pattern for a larger drawstring bag for my larger knitting projects. As I said, one thing leads to another - project then another, then another.....

Saturday, January 12, 2013

Deconstructed Mash Up - It's that time of the year

Ignore the button below use the one to the left:)


Ahhh, the flu season is upon us. Jake has been home from school with overall malaise and a fever. So many people I have talked to have a sick person in their family, so I decided to be prepared with a "perk up" card. I combined two challenges this week  - The Deconstructed Sketch and The Friday Mash Up. The Friday Mashup pic reminded me of this paper stack that I have been anxious to use AND I am really hooked on the Deconstructed Sketch.  I thought the card would have a bit of country flair with the sweet flowers and barn wood papers. The Friday Mash Up calls for 3 or more patterned papers and I think I got 5 in here with the flowers. This is such a cute set of papers to work with.

Well, Jake is on the mend this morning perhaps due to the "Jake Paste" that I make for him. I combine 1 T of coconut oil with 5 drops of Eucalyptus oil and 5 drops of Lavender oil. I rub this on his throat, chest, back and feet.  It also has a nice spa like fragrance so I use it preventatively on myself when someone else in the house is sick. How do you combat the flu season in your household?

Perk Up Card
Stamp - SU Morning Cup
Paper - My Minds Eye- On the Bright Side, basic grey and whisper white card stock
Accessories - flower punch, green ribbon, lucky limeade bakers twine, 1/16" punch, dimensionals.

Tuesday, January 8, 2013

Continuing with Organization - The Kitchen

A Bowl Full of Lemons and Clean Mama  (my 2 fav organizing and cleaning blogs) are pairing with other organizing bloggers to revisit key areas of your home to organize in the New Year's Organizing Revolution. I am taking this time to fulfill my New Years resolutions and get my home organized.

 This week we are revisiting the kitchen. Here are my attempts to get my kitchen organized. I am learning to transfer all my items into glass containers. I find this not only looks good, but I can see how much of an item I have. When I was cleaning out my cabinets, I found multiple bags of sugar and other things that I bought because I could not see that I already had plenty on hand. 

I am starting with my baking goods cabinets and breakfast area. 
Before

No we really don't drink - THAT much so I need to offload some of these glasses.
After


I put all my flours and sugars in these containers that I purchased at Target. I then printed the labels using My Digital Studio.

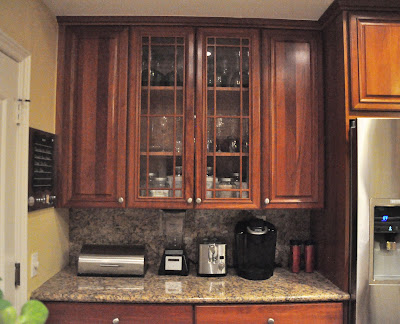
Here is the breakfast area with all the items for toast, smoothies, Megan's Krueg and her travel cups

This drawer under the breakfast station contains items for the kids lunches and Megan's coffee pods.


Here is my new Command Center using Martha Stewart products. It has my cleaning binder, my calendar, a box for receipts, calculator, post it notes, notepad and my green banking binder. To the right is a weekly menu printable in a frame that you can see in this post

Here is my cleaning binder which I love, love love. I purchased Clean Mama printables from her Etsy site. They are in tabs that I use for monthly and seasonal cleaning. I then customized my own weekly cleaning schedule printables and use them each week to keep myself on a regular cleaning schedule. It helps immensely with 2 kids, 2 dogs a cat and my biggest kid, my husband:)


I use my iCal for the whole family but I also found I needed a calendar for just my daily detailed to-do list. I purchased this great Martha Stewart planner which is customizable. It is the perfect size for me and doesn't take up too much counter space. 

AND last but not least, was the daunting task of organizing my recipe books. AHHHHH! I had so many gooey books that I used and found hard to part with. I cleaned them all out and organized them into one Martha Stewart binder with dividers for each food category ( Meat, Chicken, Apps, Salad, Bread, etc). I also kept my mom's hand written recipe cards and placed them 2 per page.   Now I actually have extra space in my cookbook cabinet.

Before
After
Each page is put in a page protector to keep the recipes from getting gooey.

Leave me a comment if you are on the organizing band wagon and partaking in the Organizing Revolution. I would love to see your organizing style and progress as well.

Happy Organizing!

Monday, January 7, 2013

Deconstructed Sketch - 1 Sketch 2 Ways


I am very excited to get to stamp once again after being away for the holidays. This week I was itching to make something from my new favorite sketch site The Deconstructed Sketch. I first started making the dress form card and thought, "Oh My Goodness, same ol' same ol' for me". It's a new year and I want to break out of my old stamping habits. My tastes are changing and I wanted something cleaner and much brighter so I made the Make a Cake card using brighter colors. Both cards were made using Taylored Expressions Key Ingredients Kits. The kits are so fun and easy to use. 

Ahh, now to the laundry - at least I will be enjoying Downton Abbey as I fold:)


Make A Cake Card
Stamps - Make A Cake
Paper - TE Key Ingredients Kit, Whisper White and Pool Party Card Stock
Ink - Pretty in Pink, Regal Rose, Real Read, Lucky Limeade, Stazon Black, Versamark
Accessories - Oval Dies, Red Glimmer brads, Cherry Cobbler Dazzling Details, Bakers Twine, Silver Embossing Powder

Dress Form Card
Stamps - Established Elegance, Kindness Matters
Ink - Stazon Black, Crumb Cake, Old Olive, Baja Breeze
Paper - TE Key Ingredients Kit December 2012, Whisper White card stock
Accessories - Oval dies, victorian lace, vintage trinkets


Thursday, January 3, 2013

New Year's Resolution to Keep Organized in 2013. - Still Plugging Away at Organization

Sometime in November, I came across a wonderful organizing blog -  A Bowl Full of Lemons. I decided to take the 14 Weeks to an Organized Home Challenge. Even though I started the challenge late, I am still plugging along to get my home organized.

Week 4  is to Organize the Home Office. I would consider the home office my Crafting Closet. It is a small walk in closet that I have turned into my crafting space. Since I have such a limited amount of space, I must constantly limit the items that I bring into it. Even though I am a Stampin' Up! demonstrator, I limit what I purchase. I pulled most things out of this jam-packed space and re-organized it. Here are the results of my efforts. Now only if it could just stay this way.


My Crafting Closet


Ribbons Organized in pull out drawer - Do you recognize the containers? They are Swiffer boxes:)

My older style punches on an IKEA rail.


My Inks and Pens are all organized in this custom  organizer from http://storageunitsink.com/
Brads, buttons, powders and smaller embellishments are in clear containers underneath with all office supplies in boxes above


My Stamps and Big Shot dies are organized to the right of my Inks with my knitting needles and Holiday stamps tucked away on the top


I keep computer cables, dies and odd pens in these decorative boxes I found at a craft store


My Nestabilities are stacked in this box on magnetic sheets to keep them together.


8 x 11 and 6x6 Paper is organized in a pull out drawer.

I usually have a visitor of some sort 

I do have more items such as the newer punches, 12x12 paper and other embellishment storage, but since my space is so small, it is almost impossible to photograph well. 

And last but not least, the sign on my door.


I would love to see your crafting space organization or if you decide to take the organizing challenge along with me. Leave me a comment if you decide to get organized in 2013.


Happy New Year! - Our Christmas Cards

Happy New Year!

After a busy Christmas season and vacation, I finally have time to post. Woo Hoo! Hopefully, I can begin to stamp again next week. 

This year I once again created our family's Christmas cards using My Digital Studio.


I love how easy and quick the program is to use and how I can customize the colors to match my photos. Best of all, I was left with plenty of time to spend with my family making happy holiday memories.